
 |
News |  |
Tutorials | |
Projects | |
Reviews | |
Authors | |
Contact | |
Search | |
Links |  |
|
Admin | |

RA2 Buildings - Aviation Research : Standard SHP
The SHP
With the 'finished' 3D model, and rendered image to work with, a basic standard building SHP can be created. This SHP will be used for inactive building states through the majority of each game.The SHP will contain 6 frames. The first three are Normal building, building damaged, and building lots of damage. The last three are shadows for each of the above.
See notes on converting buildings.
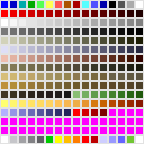
The Palette
The SHP uses a set palette. If you look for it in one of the MIX files, its called unittemp.pal. This palette covers only a limeted number color shades. As such, there are a certain number of RA2 'safe' colours which are ok to use in your 3D models. If you stray from these safe colours, you building may look dead cool when you first render, but come out all pixelated and shoddy ingame.If you look to the palette preview, you can see the different bands. Use each band to colour specific objects;
The first red band is used for the house colour. Any colour assigned to these will be remapped to the house colour.
Next two lines are bands form the grey band. Useful for concrete.
The third band of hemp colours is used for allied flooring and stone walls.
The fourth band bluey grey is used for allied tech-metal. Shiny things.
The fifth reddy peach colour is soviet brick. Used for soviet things.
The sixth is a dark shade of hemp.
The seventh is a grey golden colour.
The eighth is a golden brown colour, and runs onto a second half line.
The nineth is a small set of green colours used on the Weather machine and Nuclear facilities.
The tenth is reddy orange burning colours.
The eleventh set of blues are watery colours, used on edges of water buildings.
The very first blue is 'invisible' colour, transparent.
The bright green 5 along from top left is used for shadows.
Post Render Processing
Using the 3DSMax template, and picking sensible colours reduces much of the effort required in post processing.Key problems with the rendered image: blurriness and palette incompatability. For example, the outline of the building is right next to the blue background. If you look closely at the pixels, you have intermediate pixels which are half grey half blue. They will not be transparent. When viewed ingame, your buildings will have a faint blue line around them, which looks very bad.
The same applys for house red, slightly blurriness around the red areas means that when the house colour is changed to say 'green', a slight red line surrounds the green bit. Again, this looks terrible.
Using PSP we can easily remove the outlined bluriness.
- Open the file
- Apply the unittemp.pal (Shift+O). Nearest colour matching.
- Select the top left transparent blue as background colour.
- Select the magic wand. RGB Match mode, Tollerance 90.
- Select the existing rendered blue.
- Press delete.
This selects all the blue, and near blue shades, leaving a rough, but precise border around the building. Transparency will now work properly, and the building will look much better ingame.
For the red house colour, more precision is required. You must select all the house red areas, and surrounding pixels which are half-red. Then, copy and paste these individual areas to another blank image. Apply a special 'red only' palette (a devirative of the main unittemp). This ensures all the red areas are the precise reds we want. Now copy this pure red and overlay ontop of the original image.
If you know of a better way, please inform me.
Author: Markavian
Last edited on: 18th Dec, 12:53 pm
Please
rate this article.
« Prev page '3D Modelling' « » Next Page 'Buildup Animation' »

project Pages
Building Template
Start with a sketch
3D Modelling
Standard SHP
Buildup Animation
File Coversion
Apendix 1
